How to Create Stunning Videos with Green Screen on CapCut
Introduction
Creating high-quality videos for social media, YouTube, or personal projects often involves using special effects and editing tools that make your videos stand out. One such tool that can elevate your video creation is the Green Screen effect. Green screens allow you to replace your video background with anything you can imagine, from beautiful landscapes to exciting digital worlds. With CapCut, a free and user-friendly video editing app, you can achieve professional-looking green screen effects on your mobile device without the need for expensive software. This guide will walk you through how to create stunning videos with the green screen feature on CapCut, even if you’re a beginner.
What is a Green Screen?
A green screen is a visual effects technique used to replace a background with another image or video. The process works by filming a subject in front of a solid green (or blue) screen, and then using software to remove the green color and replace it with something else, such as a new scene, graphics, or special effects. This technique is widely used in filmmaking, TV production, and social media content creation.
Why Use Green Screen on CapCut?
- Create Professional Videos: By removing your background and replacing it with something else, you can create a professional and visually appealing video that grabs attention.
- Enhance Creativity: Green screen effects give you the freedom to transport yourself to any setting—whether it’s a beach, a busy city, or outer space!
- Save Time and Money: You don’t need expensive software or complicated studio setups to create stunning videos. CapCut offers an easy, budget-friendly solution right on your phone.
- Social Media Engagement: Green screen videos are popular on social media platforms like TikTok, Instagram, and YouTube. Using green screen effects can help make your content more engaging and shareable.
What You Need to Get Started
- A Good Video of You (or Your Subject): The green screen effect works best when the subject is filmed in front of a plain, well-lit green screen. If you don’t have a physical green screen, you can always use a digital green background.
- CapCut App: Download the CapCut app on your phone. It’s free and available for both Android and iOS devices.
- A Background Video or Image: You’ll need the new background that you want to add to your video. This could be a video, image, or even a solid color that you’d like to replace the green screen with.
- Good Lighting: Proper lighting helps create a cleaner effect, ensuring that the green screen is evenly lit and that there are no shadows on it.
Step-by-Step Guide to Using Green Screen on CapCut
Download and Open CapCut
First, make sure you have CapCut installed on your mobile device. Open the app, and you’ll be directed to the main screen where you can begin creating a new project.
Create a New Project
To start, tap the “New Project” button on the main screen. This will bring you to the media library, where you can add the video you want to edit. Select the video that has your subject filmed against the green screen.
Add Your Green Screen Video
Once you’ve selected the video, it will be placed on the timeline. Make sure the video is at the top of the timeline so that it plays over any background you add later.
Add the Background
Next, you need to add the background that you want to appear behind your subject. Tap the “+” button in the timeline to add another clip or image. This can be a video, image, or even a solid color, depending on the look you want to achieve.
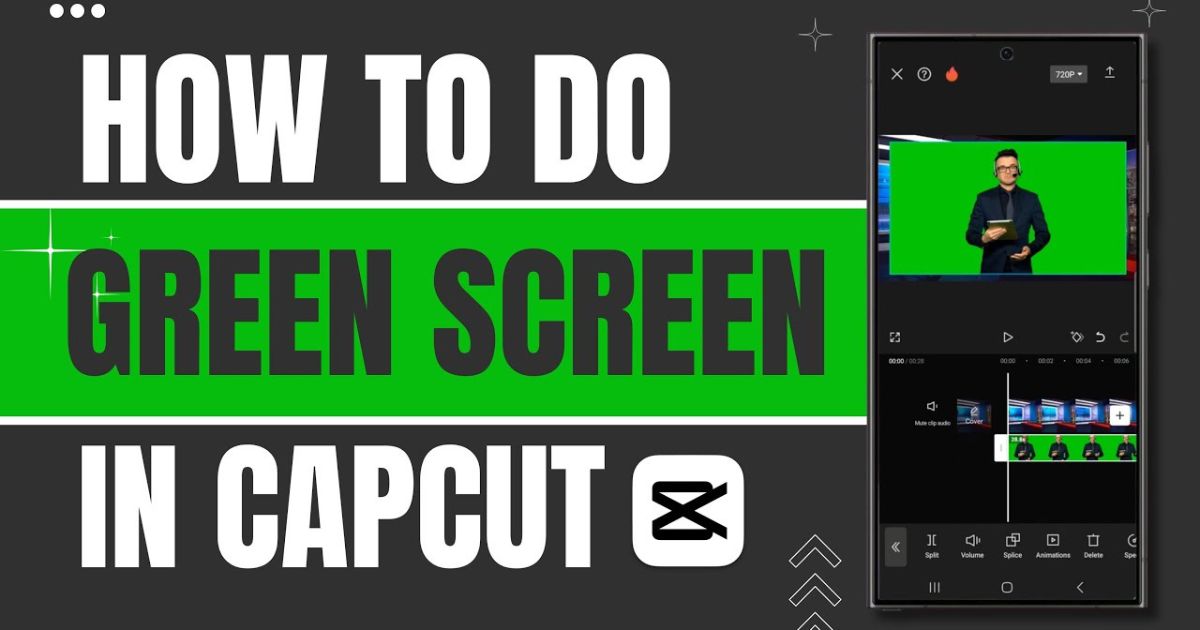
Use the Chroma Key Tool
Now comes the magic part: removing the green background! Tap on the green screen clip in the timeline to select it. At the bottom of the screen, you’ll see several options, including “Chroma Key,” which is the tool that removes the green screen.
When you tap on Chroma Key, a color picker tool will appear. Use your finger to select the green color from your video (you can adjust the intensity and area of the effect). CapCut will automatically remove the selected color (green) and make it transparent, allowing your background to show through.
Fine-Tune the Effect
To make your video look even better, you may need to adjust the chroma key settings. CapCut offers sliders for Shadow and Intensity that help you clean up any green edges around your subject.
- Intensity: This slider controls how much of the green color is removed. Increase the intensity if you see any green still lingering on the edges of your subject.
- Shadow: This controls the amount of shadow around your subject. Adjust this to get rid of any dark edges that may be left from the green screen.
Add Extra Effects (Optional)
CapCut also lets you add other special effects to enhance your video. You can use filters, animations, text overlays, and even sound effects to make your video more dynamic.
For instance, you might want to add a fun text animation or some sound effects to match the new background you’ve chosen. You can access these tools from the toolbar at the bottom of the screen.
Preview and Export
Once you’re happy with your video, tap the play button to preview it. If everything looks good, you can move on to exporting your video.
To export your video, tap the Export button at the top right corner of the screen. You’ll be able to choose the video quality and resolution before saving it to your device. Once you’re done, you can share your video directly to social media platforms or keep it for future use.
Tips for Creating the Best Green Screen Videos
- Avoid Shadows: Try to light the green screen evenly to avoid shadows that can make the chroma key effect less clean.
- Wear Contrasting Colors: If you’re in front of a green screen, avoid wearing green clothing, as it may become invisible when the green color is removed.
- Choose the Right Background: Make sure your background matches the action in your video. For example, if you’re pretending to stand on a beach, choose a background that looks natural with your subject’s movements.
- Use High-Quality Footage: To ensure the best results, use high-quality videos and images for both your green screen and background.
- Experiment with Effects: Don’t be afraid to play around with the green screen effect and other editing tools in CapCut. The more you experiment, the better your videos will become.
Conclusion
Creating stunning videos with the green screen feature on CapCut doesn’t require professional editing skills or expensive software. With just a few simple steps, you can transport yourself to any background, enhance your creativity, and produce videos that are sure to impress your audience. Whether you’re making content for social media, YouTube, or personal projects, CapCut makes it easy to create high-quality green screen videos on your mobile device.
FAQs
Q1: What is a green screen, and how does it work on CapCut?
-
- A green screen is a visual effects technique where a green background is replaced with another image or video. In CapCut, you can use the Chroma Key tool to remove the green background from your footage and replace it with a new background of your choice.
Q2: Do I need a physical green screen to use the green screen effect on CapCut?
-
- While a physical green screen is ideal, you can also use a digital green background. If you don’t have a physical green screen, make sure to use a video or image that has a solid, uniform green color to get the best results.
Q3: How do I access the green screen feature in CapCut?
-
- After importing your video into CapCut, tap on the video clip in the timeline, and then select the Chroma Key option at the bottom of the screen. This will activate the green screen effect and allow you to remove the green color from your video.
Q4: Can I use any color as a green screen in CapCut?
-
- Green is the most commonly used color for green screen effects because it stands out the most and is least likely to appear in natural skin tones. However, CapCut allows you to use other colors, such as blue, if needed. Just make sure the color contrasts with your subject.
Q5: Why does my video have a green outline or shadow after applying the green screen effect?
-
- The green outline or shadow is likely due to the green screen not being lit evenly or the chroma key settings not being adjusted properly. You can use the Intensity and Shadow sliders in the Chroma Key settings to fine-tune the effect and remove any unwanted edges or shadows.
Q6: What type of background can I use with the green screen?
-
- You can use any background you like, such as an image, video, or even a solid color. Just ensure the background matches the action in your video for a more natural look.
Q7: Can I use the green screen effect with moving backgrounds?
-
- Yes, CapCut allows you to use both static and moving backgrounds behind your subject. Just make sure the movement in the background complements your subject’s movement to make the effect look more realistic.
Q8: Is there a limit to the number of backgrounds I can use in one green screen video?
-
- No, there is no strict limit to the number of backgrounds you can use in a green screen video. You can add multiple clips or images to your timeline and use the green screen effect for each one.
Q9: How do I make sure my subject is visible after applying the green screen effect?
-
- Ensure that the green screen is evenly lit and that your subject is well-lit to avoid any blending of the background and subject. Also, use the Chroma Key tool’s Intensity and Shadow adjustments to refine the effect.
Q10: Can I add text or animations to my green screen video?
-
- Yes, CapCut allows you to add text, stickers, and animations to your green screen video. You can place text or animations over the subject or background for extra flair.
Q11: Do I need any special equipment for green screen videos?
-
- For the best results, use a solid-colored green screen (or blue, depending on your subject) and good lighting. While professional equipment helps, you can still create great green screen effects with basic tools like a plain green background and natural lighting.
Q12: Can I export my green screen video in high quality?
-
- Yes, CapCut allows you to export your video in various resolutions, including high-quality 1080p or even 4K if supported by your device.
Q13: Can I use the green screen effect with videos already saved on my phone?
-
- Yes, you can import pre-recorded videos into CapCut and apply the green screen effect to them, as long as the video meets the requirements (i.e., filmed in front of a solid green background)